Sunday, July 20, 2014

DIY Gel Manicure

Howdy!

I am going to be in a friend's wedding next weekend, which I am super duper excited about! She picked out this gorgeous OPI pink-nude nail color to go with our sangria-colored dress. I absolutely love the elegance of it all!

ANYWAY... I work all week so I can't get a manicure and I will not have time to do my nails at all in the two days before the wedding. Everyone knows that no matter what the brand, nail polish only lasts up to 3 days without chipping, so I was in a real pickle!

Then I found out about Sally Hansen's gel nail base & played around with it for weeks until I found the perfect solution that lasts over a week! So here it is, folks, the best DIY gel nail manicure around. The best part is that this does NOT require a UV salon lamp!!


The Ingredients:
  • Base Coat
  • Sally Hansen Hard as Wraps Hardener
  • ANY Nail Polish (that's right, any kind... it doesn't have to be a special gel nail polish!)
  • Sally Hansen Strengthening Top Coat OR Sally Hansen No Chip Top Coat


The Process:
The more time you can devote to this, the better, but I understand you probably have a jam-packed schedule like me, so you can definitely do this in under 15 minutes.

  1. 1 thin coat of your favorite base coat. I love the Wet 'n' Wild base coat because it really works to protect your nails and keep them healthy. (Dries in ~1 minute)

  2. 1 coat of Sally Hansen Hardener. (Dries in ~1 minute, I give it 2, just in case)

  3. 1 coat of nail polish. (Let dry for as long as you need... 3-10 minutes)

  4. 1 coat of Sally Hansen hardener. (Dries in 1-2 minutes)

  5. 1-3 coats of your nail polish. Whatever it takes to get the color you desire. (Let dry fully. You may use ice water to accelerate the drying process)
    1. Side note, if you've never used the ice water drying process, you should DEFINITELY try! Let your nails air dry for a minute or two, then put each nail under running cold water for 20 seconds OR soak your entire hand it a bowl of ice water for 20 seconds. Top 2 coats will dry automatically!
  6. 1 coat of Sally Hansen Top Coat. (Dries in 1 minute)
VIOLA! Perfect gel nails that will last at least 1 week! :)


Happy Manicuring :)

Saturday, June 21, 2014

DIY Towel Cake

I found this idea on the Internet, but I have to say, I really made it look good. Put in a little time & effort and viola! Beautiful gift straight from the registry!


My friend's bridal shower had a theme: Sunflower Soirée AND she had brown towels on her registry so this worked perfectly for me. It was a great bridal shower gift that also doubled as decor.

It isn't the cheapest gift in the book, but it's a great DIY because nothing like it exists, it's adorable, and the bride will love the way you presented her registry gift!

The end product:


What you need:
  • 2 full-sized bath towels
  • 2 hand towels
  • 2 washcloths
  • 1 dowel rod
  • 3+ corsage pins
  • silk flowers 
How to do it:
  1. Lay 1 of the bath towels flat on the ground. Fold it in half so it becomes skinnier. Roll the towel up tightly, like a sleeping bag. Set it aside. 
  2. Lay the second bath towel flat on the ground and fold it in half so it becomes skinnier. Place the first rolled up towel on top of it and roll the second towel up around the first. 
  3. Take a corsage pin and pin the end of the towel to the towel base. If you're not comfortable with it holding, use 2 or more. This is the bottom tier
  4. Repeat with the other types of towels in order to create each cake tier.
  5. Stick the dowel rod in the center of the bath towel roll. Place the dowel rod through the middle tier and place the top tier atop the dowel rod.
  6. Your cake is complete! Now all you need to do is decorate :)

Happy crafting! :)

DIY Bachelorette Gifts

I'm officially at the age where most of my friends are getting married (me included!). I've searched day in & day out for gift ideas that will blow others out of the water; something special that the bride will cherish and appreciate. I definitely use the registry as much as possible for my gifts, but when it comes to bachelorette parties, there is no registry so I just do what I want. And what I want... that is below!

Here are some ideas for some cute DIY bachelorette gifts that every bride will love :)


  1. No gift is complete without  its wrapping. 

    The bag: Panty party? Bringing lingerie? Why not decorate the bag in a very bachelorette manner? Super sexy!

  2. Stocking-stuffers.
    I love throwing little additions into a gift, goofy side notes to the main gift.
    A major one? Nail polish with a cute tagline -


    Or dress it up a little!


    There are some seriously cute ideas out there!
  3. Outfit-Inspired Gift:Don't just buy lingerie, make your lingerie gift fun!

    Traffic lights: In the red tissue wrap a non-sexy outfit to let him him he might as well stop. In the yellow wrap a cute nightie to show him to proceed with caution. In the green wrap some sexy lingerie to let him know to go for it!


    The Panty Bouquet: Roll em up horizontally & stick them in a silicon cupcake-shaped cake mold or a vase

    or any other sort of holder to look like a bouquet or cupcake! If you want to make long stem roses, use some floral tape to create the stems.


    The panty cake/box: Tie each pair of panties together with a ribbon, attaching the last one to a longer ribbon at the top. When she goes to unwrap the ribbon on the box she will pull the first pair out and more and more panties will keep coming!


    Groom's Choice: If you know the groom well enough, play to his interests. Is he obsessed with superheroes? Throw in a pair of Batman undies or Spider-Man lingerie. The groom will greatly appreciate it!

  4. The alcohol-based gift.
    Wine for first the first year(s) -


    Glammed liquor for the night: All you need is some Mod Podge, glitter, and some rhinestones or other gems from your local crafting store!


    HAPPY GIFTING! :)

Monday, May 26, 2014

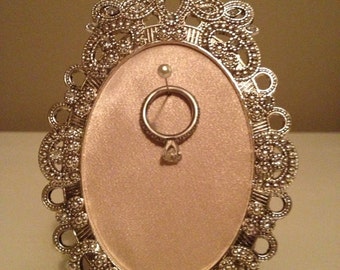
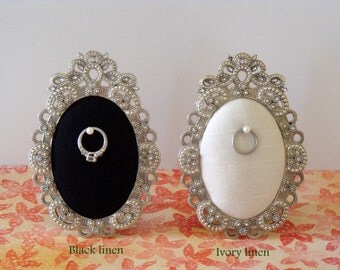
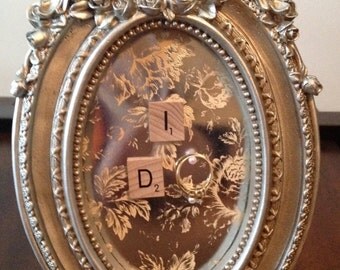
DIY Wedding Ring Framed Holder

These are so cute, I saw it on Etsy & thought to myself: "HEY! You're kinda crafty, you can do that instead of paying someone else $10 to do it & ship it to you from Randomsville, Tennessee!" So I did it! It wasn't as easy as I thought it would be, but once I figured out the trick to it, making this cutie was a breeze & a half!

What am I talking about? A framed ring holder. You can sit one by each of your sinks, so it doesn't get soapy or fall down the drain while you cook or wash your hands. It's fantastic & really could cost you less that $5. AND if you're my age and it feels like every one you know is getting married, it's a great, cheap, personal bridal shower gift. Icing on top of the cake you already baked!

First off, here are a few examples of what I'm talking about, in case my vivid description didn't do the trick for you. Take a look & make sure this is something you're interested in before you waste vital crafting time.


Okay, so you're still here so you must like what you see. Good! I'm glad I've hooked you, so I'll get to the point now. 

You'll need:

  • A picture frame. I like a tiny 1 that would fit those wallet photos that no one develops anymore because no one has room for pictures in their wallets. Get one of those. I always go to Hobby Lobby first because they have what feels like hundreds of options & they are always 50% off, so 1 frame can cost you $1-5. No biggie. Pick whichever color & design your heart desires :) If you want to go bolder or put a phrase in your frame with Scrabble letters, go bigger! The same principle to create the holder still applies.
  • Corsage Pins. You can get these from Walmart or crafting stores & they're infinitely handy. I used them for a towel cake this month too! They're the pins with the little fake pearl glued to the end; a perfect ending to make sure your wonderful ring doesn't fall off the pin!
  • Paint or something else for the background. I like to go with black acrylic paint because it dries fast & black looks great as a background color. Folkart is my go-to paint brand. You'll also need something to paint with, most people who have paint have smallish brushes that will work well ;) You can do so many things with this, just use my basic how-to guidelines to help you out.
  • Super/wood glue. A tiny bottle goes a LONG way.
  • If you want, you can even spruce up the frame itself with pearls, jewels, or sparkles. Just grab the extras & some modge-podge while you're at your local crafting store!
That is seriously it!

The Process:
  1. Get rid of your frame's glass window.
  2. Paint/decorate the frame's backing.
  3. Decorate the frame (if you choose).
  4. Take your corsage pin & stick it just north of the center of the backing. Most backings have a metal hole in this area, which will help stabilize the pin. Stick the corsage pin through this hole.
  5. Determine how far out you want the pin to stick. REMEMBER it needs to be far enough out for the ring to sit on the corsage pin & not fall off! 
  6. Once you've got the length figured out, bend the corsage pin upward so it fits in back & no one gets stabbed!
  7. Take the crazy/super/horse/wood glue & glue the pin down.
  8. After the glue sets, you may want to cover the entire back of the frame with decoration OR just paint over the corsage pin.
  9. TA-DA! Your project is complete!

The pin goes through the hole & bends around the frame prop
Super glue the pin down

Complete! This is the holder I created for myself, so excuse the poor tester handwriting ;)

There are so many different ways to vary it up, so try your own! Create a phrase or do side-by-side spousal ring holders for the bedside table. Whatever suits your fancy! That is one of the fantastic things about this, you can get so creative and personable with these. Here are some more ideas to get those creative juices flowing:


Happy crafting :)


Tuesday, October 8, 2013

Planning a Wedding on a BUDGET

A few weeks ago I got engaged to the man of my dreams. Literally 30 minutes later multiple people asked us when we were officially tying the knot.  That's right, we barely had time to be happy and in love and then the planning began.  I am a college student, graduating in December, my fiance graduated this past May (thank goodness he has a job!), he proposed mid-September, and our wedding will be in early April.  Have you done the math now? That's right, 6 1/2 month engagement and practically no money to put on the show that is a wedding!!  In my short time as a bride I have picked up a few hints and tricks how to stay on a budget.  Some of these you won't be able to do and, like me, you'll be aggravated more than ever, BUT some of these you will be able to do and it will save you greatly.

These tips will help you save money, think creatively, and bring out what is most important to you for your big day :)


-First & foremost: remember to focus on YOU, not what everyone else will think.
-Maintain your sanity. (Easier said than done...) When I realize I'm overwhelmed with information and 
  schedules, I close my eyes and breathe deeply for about three seconds.
-Decorate to your taste and not "this season's wedding fads."
-Use the groom's help. Chances are he'll want less than you & this will help you save money.
-BUDGET/"talk money" before you pick out 1 single thing. And stick to it! A reasonable budget is anywhere   from $15,000-$40,000. Do some research and find out the median price for everything; that'll help you
  learn what budget is possible for all the things you want.

Tips:
  • Use a wedding planning website, instead of a wedding planner: So many others have been through what you're going through, so learn from them! I use both The Knot and Wedding Wire currently.  Both websites are great, but contain different advice, articles, some different vendors, and different planning styles.  Here's the breakdown for my method to the madness:

    • The Knot: 
      • Checklist
      • Inspiration Boards
      • Articles
      • Design by Color or Price Range
      • Vendors

    • Wedding Wire
      • Budgeting Tool
      • Website
      • Checklist
      • Seating Chart
      • Guest List (ceremony, reception, engagement party, etc.)
      • Vendors
      • Song Lists
  • Spend your money decorating the reception hall, not the church: You'll be at the ceremony location for a fraction of the time of the reception location AND you will be focusing on your significant other the whole time & everyone will be focusing on you! Some churches already have decor you can use. If you MUST decorate the church, try some DIY crafts, Dollar Store/WalMart/Hobby Lobby Finds, or gifts from bridesmaids. Buy some tea lights to hang from ribbon. Tulle is another great option. You can wrap a single flower in some tulle to hang from the pew so
  • Hold the ceremony and reception in the same location: Many venues offer discounted prices on the reception if you hold the ceremony there too. This is a major money-saver that I was unable to do because my fiance wanted to get married in the church he grew up in, which doesn't allow alcoholic beverages, and 95% of our family and friends expected drinks to be available.  BUT, if you can, hold these at the same venue.  Your guests will be happy they don't have to drive from venue to venue and your wallet will thank you too.
  • Get a second opinion: Just because you fall in love with the decoration, don't buy it on the spot unless you have the chance of losing it. You may be able to find the same decoration for cheaper or something you like even better!! 

  • Bring a friend along: Someone who knows you well should go with you for every purchase. This way someone will balance our your sudden love for something with rationality.
  • Do DIY some things: Table numbers, placecards, programs, party favors or even a photobooth!
  • Partially DIY some things: Use DIY websites such as Shutterfly and Vistaprint to create things with photos, such as Save-the-Dates and Photo Guest Books.

  • DON'T DIY some things: Unless you have a friend that's a DJ or a photographer, I do not recommend doing these tasks yourself.  I read somewhere that a DJ can read the floor whereas a kick-ass playlist cannot.  The only things left after your wedding day (other than your undying love) are the photos. Do not skimp here!
                                                     
  • Leave out the "new fads" that you don't really care about: Don't use a program, don't make out-of-town baskets, etc.
  • Ask Questions: Ask yourself questions to find out if you need or want?? Prioritize
  • Limited/no open bar: I know, it's rough. You invite all these people to watch you be happy & expect them to survive without alcohol. HOW?! To assuage this you can give each guest a limit on how much liquor they are allowed to buy. Give each guest a "ticket" at their table or put each over-21 guest's name on a list for the bartender. Allocate only as much as you can afford per guest.  They'll be happy they get to drink & you'll be saving your pocketbook!! OR consider a beer/wine only or beer/wine + specialty cocktail. Consider only serving alcohol for half of the reception.
  • Watch Say Yes to the Dress: Know what you want beforehand when looking for your wedding gown. Watch shows, research online, & browse magazines to get an idea of what you want. THEN FIND IT CHEAPER!!


Happy wedding :D

Sunday, September 8, 2013

Money Saving Tips for ANYONE!

As a college student, I'm constantly low on money & looking for ways to make the most of my 2 cents.  I've started a list of 15 great money-saving tips for everyday life & I'm sure I'll be adding new posts in the future.  Comment if you have any ideas as well!


  1. Like going to the movies? Sign up for Cinemark's weekly emails. Each week you'll 1 email with a coupon. Examples: Buy one large drink or frozen drink (ICEE), get a free small popcorn. Now who doesn't love free food?!?
  2. When it comes to food we all know about coupons, but rarely have the time to search for them. STORES DO IT FOR YOU. Pick up any grocery store's coupon book at the front of the store. Live near an HEB? SHOP THERE. Not only are there coupons throughout the store, a booklet at the entrance, meal deals, and free food on Sundays, HEB stores also have a wall of coupons near their frozen food section by the registers. 
  3. Movie rentals are free when they come from your public library or collegiate library! Never pay for a movie rental again!
  4. I love dyeing my hair. Instead of spending $100 at a salon, I choose a $3 box of Revlon Hair Color from Walmart or Target.  If you wash your hair in cold water it'll last a few weeks before fading.
  5. Sticking with hairstyling, do you love your current style and just want to trim it up to keep it healthy? Consider getting your routine hair trim at a Great Clips, SuperCuts, or Pro-Cuts. During my college years I've even taken a pair of scissors to my bangs to keep them shaped in-between trims.
  6. Want to go out to a nice dinner? Look for places with special deals like Applebees 2 for $20 or Olive Garden's $12 for dinner today & tomorrow! Many mid-cost restaurants have deals like this to reel in college couples, but ANYONE can use them.
  7. Have a Pinterest girls' night.  My best friends and I have done this before and it's a ton of fun. We get to be creative and hang out for hours on end! So much cheaper than going to a bar.
  8. Speaking of girls' nights... or date nights... try cooking your own meal for the night or creating your own night theme. This is something new and different and so much cheaper than eating a nice dinner out for $30/plate!
  9. Love sports? Live in a college town? Go see a collegiate game. Other than football, the tickets are usually <$10/ seat!
  10. Bored on a Saturday? Go volunteer somewhere. This is free, annihilates boredom, and is something good for the community :)
  11. Keep 2 separate accounts: 1 for savings, 1 for checking.  Put your direct deposit into your savings account & siphon over whatever your budget is for the month, so you won't spend any more than you planned!
  12. Ever seen the tv show Minute to Win It? NBC's staple gameshow uses items typically found around the house... and it's a blast! Many of their games are listed here on the NBC website.
  13. So at this point I know you've heard of Pinterest... If you ever need something new, consider doing it yourself! The DIY page on Pinterest is really quite amazing. You wouldn't  believe how much money you can save by making a few things on your own.
  14. Is shopping your therapy too? That's fine, we all love the feeling a new purchase gives you!  SO sign up for emails from your favorite stores and they will give you coupons like you wouldn't imagine! New York and Company frequently gives its members free money, like $15 off a $30 purchase, which is like getting a blouse HALF OFF! JC Penney, Kohl's, and Bed, Bath, & Beyond are other stores that frequently email out coupons. & that's just the beginning!
  15. The simplest one of all: Drink water.  Whether you're at home, out for dinner, or at a sporting event: Drink water.  Not only will it save your wallet, it'll save your waistline! And when you save your waistline, you're really saving your wallet because you don't have to pay for pesky weight loss pills or surgeries 15 years from now ;)

Happy money saving ;)

Tuesday, June 18, 2013

Homemade Easy Bake Cream Cheese Cinnamon Rolls

For my triumphant return I have made my best dessert ever! Honestly it's not just the best because it tastes like heaven in your mouth, rather because it can double as BREAKFAST!

All you'll need is:

  • 2 tbsp cream cheese
  • 2 tbsp butter (softened)
  • 1 tbsp brown sugar
  • 1/4 cup white sugar
  • 1 1/2 tbsp cinnamon
  • 1 can Pillsbury crescent rolls

Instructions:
  1. Preheat oven to 350°
  2. Roll out crescent rolls
  3. Mix cream cheese, butter, brown sugar, white sugar, cinnamon until smooth (there will be some lumps of cream cheese)
  4. Spread over crescent rolls
  5. Roll up crescents
  6. Bake for 12 minutes

These puppies are DELICIOUS!!!! (I coated mine with extra cinnamon-mix)


They don't look pretty, but they taste like HEAVEN ON EARTH
Sorry I didn't take any pictures of the process, so please comment with any questions!


As always, Happy Baking!