What am I talking about? A framed ring holder. You can sit one by each of your sinks, so it doesn't get soapy or fall down the drain while you cook or wash your hands. It's fantastic & really could cost you less that $5. AND if you're my age and it feels like every one you know is getting married, it's a great, cheap, personal bridal shower gift. Icing on top of the cake you already baked!
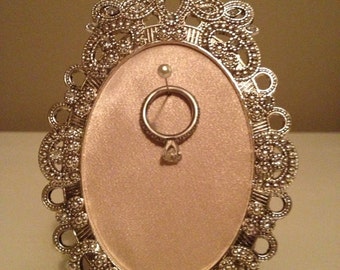
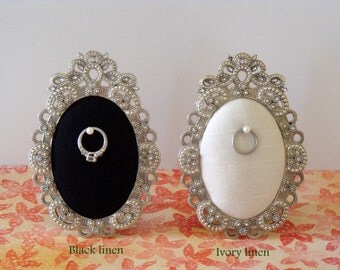
First off, here are a few examples of what I'm talking about, in case my vivid description didn't do the trick for you. Take a look & make sure this is something you're interested in before you waste vital crafting time.


You'll need:
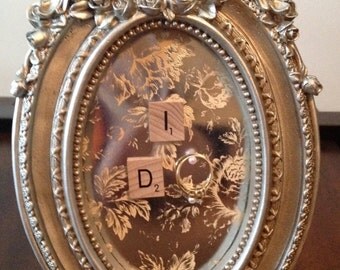
- A picture frame. I like a tiny 1 that would fit those wallet photos that no one develops anymore because no one has room for pictures in their wallets. Get one of those. I always go to Hobby Lobby first because they have what feels like hundreds of options & they are always 50% off, so 1 frame can cost you $1-5. No biggie. Pick whichever color & design your heart desires :) If you want to go bolder or put a phrase in your frame with Scrabble letters, go bigger! The same principle to create the holder still applies.
- Corsage Pins. You can get these from Walmart or crafting stores & they're infinitely handy. I used them for a towel cake this month too! They're the pins with the little fake pearl glued to the end; a perfect ending to make sure your wonderful ring doesn't fall off the pin!
- Paint or something else for the background. I like to go with black acrylic paint because it dries fast & black looks great as a background color. Folkart is my go-to paint brand. You'll also need something to paint with, most people who have paint have smallish brushes that will work well ;) You can do so many things with this, just use my basic how-to guidelines to help you out.
- Super/wood glue. A tiny bottle goes a LONG way.
- If you want, you can even spruce up the frame itself with pearls, jewels, or sparkles. Just grab the extras & some modge-podge while you're at your local crafting store!
That is seriously it!
The Process:
- Get rid of your frame's glass window.
- Paint/decorate the frame's backing.
- Decorate the frame (if you choose).
- Take your corsage pin & stick it just north of the center of the backing. Most backings have a metal hole in this area, which will help stabilize the pin. Stick the corsage pin through this hole.
- Determine how far out you want the pin to stick. REMEMBER it needs to be far enough out for the ring to sit on the corsage pin & not fall off!
- Once you've got the length figured out, bend the corsage pin upward so it fits in back & no one gets stabbed!
- Take the crazy/super/horse/wood glue & glue the pin down.
- After the glue sets, you may want to cover the entire back of the frame with decoration OR just paint over the corsage pin.
- TA-DA! Your project is complete!
 |
| The pin goes through the hole & bends around the frame prop |
 |
| Super glue the pin down |
 |
| Complete! This is the holder I created for myself, so excuse the poor tester handwriting ;) |
There are so many different ways to vary it up, so try your own! Create a phrase or do side-by-side spousal ring holders for the bedside table. Whatever suits your fancy! That is one of the fantastic things about this, you can get so creative and personable with these. Here are some more ideas to get those creative juices flowing:


Happy crafting :)
No comments:
Post a Comment